Hacking My Garage With A Raspberry Pi
Several months ago our Craftsman garage door openers stopped responding to our remotes. I tried everything I could think of to fix this problem, short of buying anything new. Garage door opener parts are expensive, to the point buying new openers is a better option.
After much research I found out that RF interference was the issue. No new remote or logic board was going to solve the issue, even getting new openers wouldn’t solve the issue.
By knowing the wall switches work by simply closing the circuit I set out for a wireless solution that we could control from our iPhones. I wanted to try my hand at an Arduino, but getting WiFi to one isn’t cheap. I then discovered the Raspberry Pi had programmable pins. Getting wireless to the Pi was nearly $80 cheaper, plus it allowed me to leverage languages I already knew. I soon placed an order on Amazon for all my parts.
- Raspberry Pi Model B Revision 2.0 (512MB)
- or Raspberry Pi Model A (256MB)
- Edimax EW-7811Un
- SainSmart 2-Channel 5V Relay
- Female to Female Jumper Wires (If you don’t feel like soldering.)
Don’t forget (assuming you don’t have these lying around):
After getting the parts in I wrote a quick node.js app that serves a single page and also has a 2 backend requests to open each garage. I also quickly wrote an iOS app as well. I’m using Forever to make sure the app stays up. To install node.js and forever from your command line on the Raspberry Pi enter these commands.
$ sudo apt-get install node
...
$ sudo npm install forever -g
The only issue I came across was that the relay I bought turned on when firing low, and off when high. The Raspberry Pi has a default state of low, but the GPIO pins are set to input mode so the relay doesn’t immediately fire until the pin is set for output.
As far as wiring goes, I have 2 sets of door switches. The regular wall switches that came with the openers which are right next to each other, then a separate set of switches wired in another part of the garage. I went to Lowes and got some Alarm Wire (it has 4 wires inside of it), this made me only have to make one run from the Pi. I just connected my wires to the back of each wall switch using the COM and NO ports from the relays. It doesn’t matter how these are connected as you are just completing the circuit. I used this guide in my plans for this project.
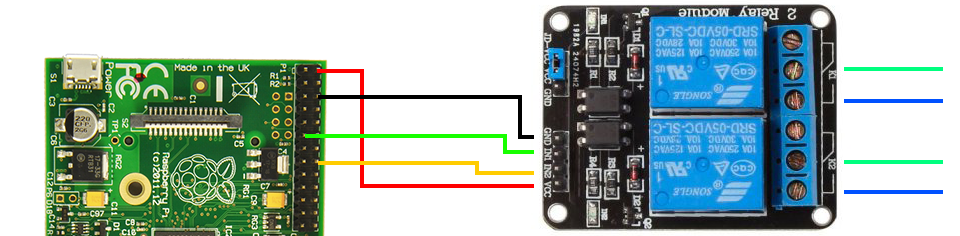
I have open sourced the node.js app at brentnycum/garage-node. I have also open sourced the iOS app at brentnycum/garage-ios, in order to put this on your device you need an iOS Developer Account from Apple. I ended up creating my own fork of pi-gpio to handle using the additional GPIO pins on the Raspberry Pi Model B Rev 2.0 that I used, as I soldered the relay to the board instead of using the pins. The wiring above matches my node app.
To get the node.js app from Github you can either choose to download the zip file, or you can use the simple command.
$ git clone https://github.com/brentnycum/garage-node.git
Once you have the code on your Raspberry Pi, move into the app’s directory and run the npm install command to install the dependencies. npm is the node package manager.
$ cd garage-node
$ npm install
After all the dependencies are installed you can run the app. Once it’s running you will be able to point your browser to your Raspberry Pi at port 3000 (ie http://192.168.1.105:3000).
$ node app.js
or
$ forever start app.js
Be sure to change the config.js file if you are using any different pins.
Additional Reading: